Wow, I have been gone a while!
Things like work, crafts, Halloween, my birthday, the election and friend visits got have completely pushed updating on here to the bottom of my priority list. Lately, when I've been getting the urge to write, I focus on my play instead of my blog. But I promised a series on my art/decor projects, and I really only have a few left to mention.
When we first moved into our apartment, the only decorations we had were the few things from my old apartment and some things from our wedding. Here is an example. I had some picture frames from my apartment, we got some shelves as wedding presents and instead of a guest book, we had everyone sign a picture frame mat.
Together they make a nice focal point on our living room wall. I'm pretty proud of the frame arrangement, too. I tried to do a more random looking arrangement, but Robert prefers symmetrical designs. I bought the "R" and "S" from Hobby Lobby, painted them black and hung them with the frames to add some variety.
Another piece I had from the wedding was this thank you sign we took pictures with at the wedding for the thank you cards. I simply bought a piece of wood, spray painted it with crackle paint, and painted "Thank You" on it with black acrylic paint. Ta-da!
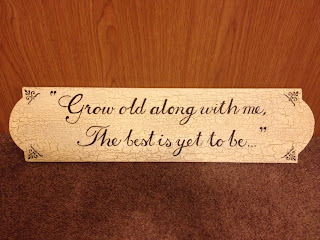
I still had the sign, but "Thank You" seemed like a random and rather odd message for guests in our home. So, I flipped that sucker over (I had painted the back in crackle paint, as well, cause I'm thorough like that), and I decided to write a quote that I love on the back. One quote that means a lot to me is "Grow old along with me, the best is yet to be..." by Robert Browning. I think it is such a beautiful quote, I used it in our wedding program. Robert Browning and Elizabeth Barrett Browning's love story is so inspirational. There is also an entire library (the Armstrong Browning Library) dedicated to their works and legacy at our alma mater, Baylor University.
Here it is all finished!
I hung it above the living room window. It's a nice reminder when I'm having a bad day.
The last projects I tackled were seen in my previous post for a DIY headboard. They are my simple and cheap lampshade upgrades and the not-so-simple but still cheap toilet paper roll art.
I had very plain white drum shades that we very "blah." I found some lovely satin ribbon at Joann's fabric store, and all I did was cut them into strips long enough to wrap around the lampshade once and hot glue them along the seam of the existing lampshade.
I went for the ombre effect and am very pleased with the results. And it literally cost me about $10 and less than 30 minutes!
Now, toilet paper roll art has been a popular trend lately in the DIY world because there are tons of possibilities, and it's essentially FREE! I mean, seriously, you would just throw them away anyway! I found this design that I just loved from a great blog. I used her finished product as a guideline for my design, but I made mine smaller and changed the outer are a little. I cut my toilet paper rolls about 2" long, but were I to do it over again, I would make them closer to 1" so that the rolls would go farther. The metallic spray paint I used ended up giving it a great finished look, and my friend Danielle who visited recently thought it was metal!
I'm so happy with how our bedroom (and apartment in general) looks now compared to when we moved in! And I still have to hang our diplomas, and I'm always looking for things to add like a new rug or throw pillows or candle sconces. If only I could paint the walls!! Regardless, I love how home decor is a fluid art, always changing and being updated. I can't wait till we have a bigger apartment or a house so I can really go design crazy!
Stay tuned for my fall decor ideas, and little ways I made my small space festive for Halloween, Thanksgiving and autumn in general.
Making a house a home, one project at a time!


.JPG)


.JPG)
.JPG)
.JPG)
.JPG)
No comments:
Post a Comment